
Here's a sneak peak with the status of the SS180 reassembly with my buddy Ted above. Ted has done most of the work and has been teaching me a lot along the way. We spent over three hours on it last night and will spend quite a bit more on a weekly basis moving forward.

It looks really clean and I am beginning to get very excited about the progress being made.

We're going to be able to add fuel soon and fire it up.
Without a doubt this is my favorite stage of the restoration, because the countless hours of research and shopping for parts is paying off.

Cables and electrical are all run. Oil will go into the tranny soon and the gas tank will be installed in the near future.
 Here's a sneak peak with the status of the SS180 reassembly with my buddy Ted above. Ted has done most of the work and has been teaching me a lot along the way. We spent over three hours on it last night and will spend quite a bit more on a weekly basis moving forward.
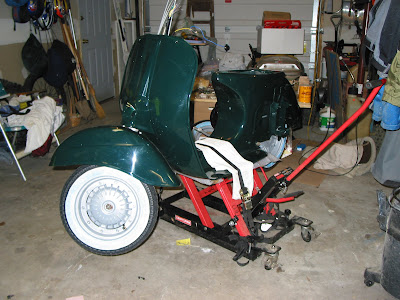
 It looks really clean and I am beginning to get very excited about the progress being made.
 We're going to be able to add fuel soon and fire it up.
 Without a doubt this is my favorite stage of the restoration, because the countless hours of research and shopping for parts is paying off.
 Cables and electrical are all run. Oil will go into the tranny soon and the gas tank will be installed in the near future.
5 comments:
Two things. Put the floor aluminum strips on before you put the motor in. Two reasons: It's WAY easier to manipulate the body around as you position tracks and peen the rivets over. Secondly, the cylinder gets in the way of installing the floor track rivets at the rear of the R/H floor section. Really, the FIRST thing to put on the main body while it is still a "bare" body are the floor tracks. Drop the motor out while it's still easy so you can do the tracks.
- Paul B.
Also, loose the air cleaner assembly at this point because you'll need to tune it later anyway and it will need to be removed then and you need to put the cable (spark plug cable and harness to the junction box) through the securing strap that goes on the screw under the air cleaner bottom case (the same screw that secures the top of the cylinder shroud. And, put the air horn on (the aluminum, curved, tubular thing that the air bellows connects to) before the motor, (nuts and washers on the inside of the body, no markings on the bolts)it's easier. And easy is good. :)
- Paul B.
And - (sorry, just thinking scattered tonight!), put the "Super Sport" rear script and taillamp on before putting the motor in - again, easier. And, put the exhaust on before the rear tire, can't get the main exhaust bolt on with the tire on, and it's a pain in the ass to get the tire off with the motor in.
- Paul B.
Thanx Paul B.
Thanks, great blog post
Post a Comment