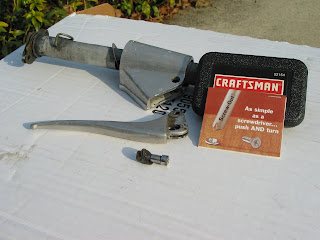
The screw that holds the clutch lever would not come out for me. The nut came off very easily. I used PB Blaster several times a flat head screw driver twice, before beginning to strip the chrome threads. First, I contacted scooter shops and verified I could replace the part. I can. I then used two nuts on the screw to back in out. No go. I emailed for help on Scooter BBS forum and was told to gently tap it out with a hammer. I used my copperhead hammer (copper is softer than a lot of metal to the hammer gets dinged up, but the part doesn't) and freed the screw. But before I did this, I made sure to ask if there were any threads in the clutch housing to avoid stripping them. Two people wrote me and said "no, you're fine." When I got the screw out and looked inside, I saw threads. The next moring I checked the forum again and two people wrote me franticially and said "DON'T TAP! THERE ARE THREADS!!" I owned a drill bit set that is designed to remove stripped screws and did not even think to use it. Damn myself. Using pliers on the treaded to part of the screw to back it out would also be a bad idea as the stripped threads would move through the threaded clutch housing and destroy those threads to. The way of least resistance, not a hammer, is always the best. Stop. Ask a few different sources. Take your time. Relax about your problem and THINK it through. Now I have two damaged parts instead of one. I hope a metric tap and dye set will be able to save what little threads I have or I will need to heli-coil in some new threads or use a lock nut. What a drag. This mistake was easy to avoid and would have only cost me $2 (for the replacement screw) if I had done it correctly.
Saturday, December 23, 2006
Stuck: clutch lever screw
The screw that holds the clutch lever would not come out for me. The nut came off very easily. I used PB Blaster several times a flat head screw driver twice, before beginning to strip the chrome threads. First, I contacted scooter shops and verified I could replace the part. I can. I then used two nuts on the screw to back in out. No go. I emailed for help on Scooter BBS forum and was told to gently tap it out with a hammer. I used my copperhead hammer (copper is softer than a lot of metal to the hammer gets dinged up, but the part doesn't) and freed the screw. But before I did this, I made sure to ask if there were any threads in the clutch housing to avoid stripping them. Two people wrote me and said "no, you're fine." When I got the screw out and looked inside, I saw threads. The next moring I checked the forum again and two people wrote me franticially and said "DON'T TAP! THERE ARE THREADS!!" I owned a drill bit set that is designed to remove stripped screws and did not even think to use it. Damn myself. Using pliers on the treaded to part of the screw to back it out would also be a bad idea as the stripped threads would move through the threaded clutch housing and destroy those threads to. The way of least resistance, not a hammer, is always the best. Stop. Ask a few different sources. Take your time. Relax about your problem and THINK it through. Now I have two damaged parts instead of one. I hope a metric tap and dye set will be able to save what little threads I have or I will need to heli-coil in some new threads or use a lock nut. What a drag. This mistake was easy to avoid and would have only cost me $2 (for the replacement screw) if I had done it correctly.
Labels:
brake lever,
clutch lever,
repair,
restoration,
scooter,
Vespa,
Vespa SS180,
Vespa VSC,
vintage
Thursday, December 21, 2006
Gas tank restoration
Christopher stressed to me the importance of coating the gas tank with 2-stroke oil immediately after the "hot tank" inside the tank and then to use PPG Metal Cleaner and Conditioner (see the paint stipping post). I went to Advance Auto and picked up some "2-stroke Pennzoil for air-cooled engines."
Ernie, at Smitty's Radiator, charged me $45 total for the "hot tank" and then he bead blasted the tank to clean out all rust debris and he dried it as he bead blasted. He quickly coated the inside with oil generously. The tank was slightly pitted, but the structural integrity of the tank was solid. I picked up the gas tank and then PPG prep'd it for the painter. It is highly recommended, by Tom Giordano
Monday, December 18, 2006
Stripping paint yourself
Thanks to Christopher Markley, of Moto-Rapido, for schooling me so well.
Labels:
aircraft stripper,
paint stripping,
restoration,
scooter,
Vespa,
Vespa SS180,
Vespa VSC,
vintage
Subscribe to:
Posts (Atom)